
Screen Patio Enclosure & Footing (Project #4288) – Trent Creek Dr, Ruskin, FL
 Ruskin
 March 19, 2026
 22 × 17 ft footprint (374 sq. ft.); 925 sq. ft. of screened surface; 8.5 ft wall height
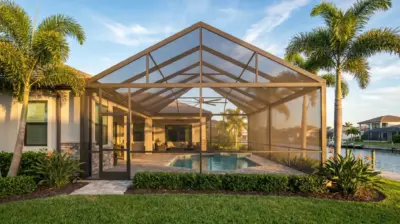
This Ruskin screen patio enclosure covers a 22 × 17 ft paver patio with a mansard roof, 2 × 6 SMB beams, cable bracing, and No-See-Um screen. It stands 8.5 ft at the walls, rests on a reinforced concrete footing, and connects to the house through a 7-inch Super Gutter. The permit stage took 3 weeks, and the build took 2 weeks.


Project Overview
At the Trent Creek Dr home in Ruskin, the homeowners wanted to use their backyard patio without insects. Project #4288 added a new screen patio enclosure over a 22 × 17 ft paver patio. The walls stand 8.5 ft high, and the screened surface totals about 925 sq. ft.
The structure starts below the pavers. A reinforced concrete footing runs around the patio edge, and the aluminum posts are anchored through the pavers into it, so the frame is tied to a solid base instead of loose paving.
A mansard roof with 2 × 6 SMB beams covers the enclosure, and cable bracing stiffens the frame. A 7-inch Super Gutter connects the roof to the house and carries rain away from the structure. An access door gives the family a direct route between the patio and the yard. The posts, beams, and bracing share one consistent bronze finish.
The project photos follow the work from the excavated footing trench to the sand base, the laid pavers, and the finished enclosure. No-See-Um screen mesh covers the walls and roof. Its fine weave keeps out very small insects and windblown debris while keeping airflow and daylight in the space. Every property needs its own measurements and estimate, so the figures here describe this installation only.
Homeowners considering a similar upgrade can explore our screen enclosures in Ruskin.
The permit stage took 3 weeks, and installation took 2 weeks. Finished on March 19, 2026, Project #4288 was reported at a cost of around $17,000. The enclosure turned the patio into a cleaner, more comfortable outdoor living space, protected from insects and open to airflow and daylight.
Before & After

Reinforced Concrete Footing for This Patio Enclosure
A screen patio enclosure that stands on a paver patio needs a solid base under the frame. Before the aluminum went up, our crew excavated a trench around the patio perimeter, set the reinforcing steel, and poured a 12 × 12 inch monolithic concrete footing, as shown in the engineering plans for this project.
The footing details call for 3000 PSI concrete and two continuous #5 bars with 3 inches of concrete cover over the steel. The rebar was set in the trench before the concrete was placed, so the steel sits inside the footing instead of on top of it.
Once the footing was in place, the sand base was prepared and the pavers were laid. The aluminum posts are anchored through the pavers into the footing, with anchors that penetrate at least 2¾ inches into the concrete, as specified on the plans. The finished surface looks clean and simple; underneath it is the reinforced foundation supporting this 22 × 17 ft patio enclosure.


How We Did It
Project #4288 followed the complete design-build sequence for a screen patio enclosure and footing in Ruskin. After an on-site consultation and measurements, the team confirmed a 22 × 17 ft layout with a mansard roof, 8.5 ft walls, and a reinforced concrete footing. The 3D visualization, site plan, and engineering plans came next. Permitting took 3 weeks, followed by footing work, material preparation, and a 2-week installation. The work was completed on March 19, 2026, and the finished enclosure moved into warranty and ongoing company support. The six stages below describe how the planning, materials, and construction came together for this screened patio.
Our specialist visited the Ruskin property to evaluate the backyard, the rear wall of the house, the planned patio area, and the roofline. Measurements were taken for the 22 × 17 ft enclosure with 8.5 ft walls. During this stage, the homeowners selected the bronze aluminum finish, the mansard roof design, No-See-Um screen mesh, and the 7-inch Super Gutter connection. After the scope, materials, pricing, and timeline were confirmed, the contract was finalized. This visit set the foundation for every later stage, from design to permit and installation.

Using the field measurements, the team prepared a 3D visualization, a site plan, and engineering plans for the enclosure. The plans show the 22 × 17 ft footprint, the mansard roof, the 2 × 6 SMB beams, the cable bracing, the 7-inch Super Gutter, and the concrete footing with its anchor details. This planning stage let the homeowners review the proportions before construction began, and it fixed how each frame member connects to the footing and the house. The same documents were used to prepare the permit application.

Once the design and engineering documentation were complete, the permit package was prepared and submitted for review. The team coordinated the site plan and engineering plans for the Ruskin patio enclosure, including the footing and anchor details. The permit stage took 3 weeks, after which the project moved into footing work, material preparation, and installation. Review periods differ by property, so another project may need a different timeline.

Materials were prepared according to the engineering plans before installation began at the property. After the footing and the paver patio were in place, the installers assembled the bronze aluminum frame, set the mansard roof structure, and anchored the posts through the pavers into the footing. The 7-inch Super Gutter was connected to the house, cable bracing was installed, and No-See-Um screen mesh was fitted to the walls and roof. The complete installation took 2 weeks. Each step followed the engineering drawings.

After installation, the team checked the screen fit, access door operation, frame connections, anchor points, cable bracing, Super Gutter, and overall finish. The completed enclosure covers a 22 × 17 ft paver patio under a mansard roof, with No-See-Um screen mesh across the walls and roof. The homeowners could then see how the bronze frame and screen defined the patio. Project #4288 was completed on March 19, 2026. The enclosure was then ready for everyday use by the family.

Following the final handover, the completed patio enclosure was placed under Screen Factory Florida’s warranty and ongoing support. Our team remains available to assist with questions related to the screen panels, the access door, hardware, or other installed components. The homeowners can now enjoy a protected, screened patio with dependable support after installation. Questions about care or maintenance can be directed to the same team that built the structure.

Want a Similar Result?
Get a free estimate for your project —
we’ll call you back within 15 minutes.
Design, Permits & Project Planning
Project #4288 brought a bronze screen patio enclosure to a home on Trent Creek Dr in Ruskin. The structure covers a 22 × 17 ft paver patio with 8.5 ft walls and a mansard roof. Planning covered the 2 × 6 SMB beams, the cable bracing, No-See-Um screen mesh, the 7-inch Super Gutter connection to the house, and the reinforced concrete footing with anchors through the pavers. The 3D visualization and site plan confirmed the proportions and placement before construction. The permit stage took 3 weeks, and installation took 2 weeks, so the project was completed on March 19, 2026. Together, these decisions defined the scope, the materials, and the schedule.
The engineering package defined the structural requirements for the 22 × 17 ft screen patio enclosure, including the mansard roof geometry, the 2 × 6 SMB beam layout, cable bracing, and attachment to the house through a 7-inch Super Gutter. It also specified the foundation: a 12 × 12 inch monolithic concrete footing and anchors that penetrate the pavers into the footing. Each member is labeled by size on the plans, and the legend marks the cable bracing, so the layout could be checked against the structure during installation. The package was prepared for permit review, which took 3 weeks. The drawings show plan, front, and side views with dimensions.

The 3D model provided a clear preview of the screen patio enclosure before fabrication and installation began. It showed the mansard roof, the bronze frame, the 22 × 17 ft footprint on the paver patio, the cable bracing, the downspout, and how the structure connects to the house. Reviewing these views together with the plans helped confirm the proportions and placement before construction began. The model also shows the enclosure from several angles, including the roofline, the way the frame meets the house wall, and the door position near the house wall, which made it easier to judge the layout before anything was built.

The site plan placed the new screen patio enclosure on the lot against the rear of the two-story residence. It shows the 22 × 17 ft footprint, the clearances to the property lines, with about 10 ft to the nearest side line, and the lot outline along Trent Creek Drive with a north arrow, so the position of the structure could be checked against the boundaries. It supported permit coordination and confirmed exactly where the enclosure sits on the 112 ft deep lot before the footing was excavated. These dimensions let the team verify the layout against the property boundaries and the existing house before the footing work began.

Frequently Asked Questions
Answers to common questions about screen patio enclosures in Ruskin, including cost, permits, concrete footings, timelines, and maintenance.
How much does a screen patio enclosure with a concrete footing cost in Florida?
The cost depends on the size of the structure, the frame finish, the roof style, the screen type, the number of doors, and the foundation work. A footing adds excavation, steel, and concrete to the scope, so an enclosure that needs one costs more than a frame set on an existing slab. For Project #4288 in Ruskin, the reported cost was around $17,000 for a 22 × 17 ft screen patio enclosure with a mansard roof, No-See-Um screen, a 7-inch Super Gutter, and a reinforced concrete footing. That figure describes this installation only. The most reliable way to price your own enclosure is an on-site visit, a measured scope, and a written estimate that lists the foundation and every feature included.
Do you need a permit to build a screen patio enclosure in Florida?
In most cases, yes. A screen patio enclosure is a structure, and Florida counties and cities generally review it before construction, including the foundation details. Requirements differ by location, so check with the local building department or ask your contractor to confirm them for your address. For Project #4288 in Ruskin, the permit stage took 3 weeks before the footing and the frame work began. Another project may take more or less time, depending on the property, the complexity of the structure, and how complete the application is when it is submitted. A contractor who prepares the site plan and engineering plans can keep the schedule clear.
Why does a screen patio enclosure need a concrete footing?
The footing is the part of the structure that ties the frame to the ground. A reinforced footing spreads wind loads into the soil and gives the anchors solid concrete to hold, which a bare paver surface cannot do. On Project #4288, the engineering plans call for a 12 × 12 inch monolithic footing with two continuous #5 bars, and the posts are anchored through the pavers into that concrete. A lighter patio structure may sit on an existing slab if the slab is approved for it. Ask your contractor which foundation your enclosure needs and how it will be anchored. That is why the foundation is shown on the engineering plans together with the frame.
How long does it take to build a screen patio enclosure with a footing?
The timeline has several parts: the permit stage, the footing work, and the installation of the frame and screen. On Project #4288 in Ruskin, permitting took 3 weeks and the installation took 2 weeks, with the work completed on March 19, 2026. The footing needs time to be excavated, reinforced, poured, and cured before the posts are anchored, so it should be scheduled before the aluminum arrives. Before you sign a contract, ask for the expected permit window and the installation schedule in writing, and ask how weather could move the dates. Footing work and paver installation add time compared with a frame set on an existing slab.
How do you take care of a screen patio enclosure on a paver patio?
Rinse the screen panels and the frame with a garden hose from time to time to remove dust, pollen, and debris. Check the mesh for small tears and repair them early, because a small opening can grow. Open and close the access door to confirm that the hinges and latch move smoothly, and inspect the frame connections and fasteners after major storms. On a paver patio, keep the joints between the pavers and the base of the posts clear of dirt and weeds. Keep the gutter and downspouts clear so water does not collect against the frame. For questions about this installation, contact Screen Factory Florida and reference Order #4288.
More projects
Explore more screen enclosure and pool cage projects in the Florida area.


Our Services
From custom pool enclosures and screened lanais to motorized screens and hurricane shutters, we create outdoor spaces made for the Florida lifestyle. Every solution combines lasting protection, everyday comfort, and clean design – so you can enjoy more fresh air, fewer insects, and peace of mind in any weather.

 Hi, I'm Alex, your project consultant. Fill in the details and I'll personally get back to you today.